How to track storage changes on your Mac
Short answer. macOS shows how your storage is used right now, but it has no built-in view of how that changed over time, so it can't tell you what grew last week. To track changes yourself, save a dated snapshot of free space and folder sizes once a week and compare it with the last one. If free space fell by much more than your home folder grew, the growth is in system files rather than your own.
Why your Mac can't tell you what changed
- Storage settings shows today only. Apple menu > System Settings > General > Storage adds up each category when you open it. There's no graph and no "last week".
- Activity Monitor measures something else. Its Disk tab shows how much data apps read and write, not how much space is used. An app can write gigabytes and delete them again, leaving free space where it was.
- Time Machine keeps your files, not a record of sizes. It can restore a folder, but it won't tell you when that folder doubled.
So to see a trend, you need to record the figures yourself, or use an app that records them for you.
The simple way: note Storage settings once a week
No Terminal needed.
- Choose Apple menu > System Settings, then General > Storage.
- Wait for the bar at the top to finish loading.
- In Notes or a spreadsheet, write down the date, the free space and the size of the biggest categories.
- Repeat each week, at about the same time of day.
This tells you which category grew, but not which folder. To check a folder, select it in Finder and choose File > Get Info. Downloads, Movies and Pictures are the usual suspects.
The better way: a dated snapshot with df and du
This short script records your free space and the size of every folder in your home folder, so you can see exactly where growth happened.
- Open Terminal (in Applications > Utilities).
- Type
nano ~/storage-snapshot.shand press Return. - Paste the script below, press Control-O then Return to save, and Control-X to close.
#!/bin/zsh
# storage-snapshot.sh: notes free space and folder sizes. It only reads; it changes nothing.
dir="$HOME/storage-snapshots"
mkdir -p "$dir"
file="$dir/$(date +%Y-%m-%d).txt"
{
  echo "Snapshot taken $(date)"
  df -h /System/Volumes/Data
  echo
  du -d 2 -m "$HOME" 2>/dev/null
} > "$file"
echo "Saved $file"
- Run it whenever you want a snapshot:
zsh ~/storage-snapshot.sh
This saves a file named after today's date, such as 2026-10-08.txt, in a storage-snapshots folder in your home folder. Inside are two things:
dfshows your startup disk. The Avail column is your free space.dulists the size in megabytes of every folder in your home folder and one level below, such asLibrary/CachesorMovies/Exports. It includes hidden folders such as.npm. The last line is your whole home folder.
The script only reads sizes and writes that one text file. It can take a few minutes on a large home folder. macOS may ask whether Terminal can access folders such as Desktop, Documents and Downloads, or data from other apps. If you say no, those folders are skipped. macOS remembers your answer, so your snapshots stay comparable.
Once a week is enough for most people. Set a repeating reminder in Reminders, and take an extra snapshot before and after big events such as a macOS update or a cleanup.
Compare two snapshots
You can open both files in TextEdit and compare them by eye: the Avail figure first, then the last line. diff works too, but it's noisy, because almost every folder changes a little and du can list them in a different order.
This command shows only the folders that changed by 500 MB or more. Put the older file first:
cd ~/storage-snapshots
awk -F'\t' 'FNR==NR {old[$2]=$1; next} $1 ~ /^[0-9]+$/ {d=$1-old[$2]; if (d>=500 || d<=-500) printf "%+8d MB  %s\n", d, $2}' 2026-10-01.txt 2026-10-08.txt
It only reads the two files. The result looks something like this:
  +18342 MB  /Users/you/Movies/Exports
  +18342 MB  /Users/you/Movies
   +2210 MB  /Users/you/Library/Caches
  +20961 MB  /Users/you
A folder and the folder above it both appear, so the deepest line tells you where the growth is. A new folder shows its full size. A folder you deleted doesn't get a line of its own, but the drop shows in the folder above it.
What to watch
- Downloads, Movies, Pictures, Music, Documents and Desktop. These hold your own files. Your Photos library lives in Pictures by default, so a big import shows up there.
- Library/Caches. These are copies apps can rebuild or download again. Slow growth is normal, and they often grow back after you clear them. One app with a cache of several gigabytes is worth a look.
- Library/Containers and Library/Group Containers. These hold data for sandboxed apps, including many from the Mac App Store. Messaging and video apps can get large here.
- Library/Developer. If you use Xcode, this holds build data, simulators and device support files. It can grow by gigabytes after an Xcode or iOS update.
- Library/Application Support. Among much else, iPhone and iPad backups live in
MobileSync/Backupinside it. - Hidden folders such as
.npm,.cacheor.gradle. These are package caches from developer tools.
To see one level deeper inside a folder that grew, for example Containers:
du -d 1 -h ~/Library/Containers 2>/dev/null | sort -h
This lists each folder inside it, smallest first, and changes nothing. The folder names are app identifiers such as com.apple.mail, not app names.
How to read the changes
- Free space fell more than your home folder grew. Compare the drop in Avail with the change on the home folder line. If free space fell by 20 GB but your home folder grew by only 2 GB, the rest is outside it. That usually means a downloaded macOS update, Time Machine local snapshots, swap files, Apple Intelligence models or system caches. Storage settings counts many of these as System Data or under macOS. Why System Data gets so large explains each one.
- One big jump is usually one event: an update, a large download or video export, a new iPhone backup, a game. The folder line tells you which.
- Slow, steady growth is usually caches, mail, messages, photos or developer tools. Why Mac storage keeps filling up covers the common causes.
- Space came back after you cleared it. Caches regrow by design. Clearing them again just makes apps rebuild them.
- Just after a macOS update, used space can jump for a day or two and then fall back. Compare a few days later before acting.
To check Time Machine's local snapshots:
tmutil listlocalsnapshots /
This lists the snapshots kept on your startup disk and changes nothing. macOS removes them by itself when it needs space, so they rarely need deleting by hand.
Why the numbers don't always match
- Purgeable space. Finder and Storage settings can count space macOS is able to clear as available.
dfdoesn't, so it can show less free space. - Cloned files. When you duplicate a file in Finder, the copy can share space with the original.
ducounts both in full, so its totals can be higher than the space really used. - iCloud files. Files that are in iCloud but not downloaded take almost no space, and
ducounts them that way.
None of this matters much for tracking. Compare the trend between snapshots, not the exact numbers.
Where DiskFox helps
If you'd rather not keep snapshots by hand, DiskFox does the recording for you. Each scan stores the size of each location it measures and of the folders in your home folder. It never stores file names. What Changed then compares scans and leads with a summary such as "Storage use grew by 30.2 GB this week", split by group, followed by dated events.
Changes in your own folders are named, such as a folder in Movies that grew. Each event is labelled Cause when DiskFox measured that location directly, or Likely cause when it's an inference, such as growth within 72 hours of a macOS update. Large changes it can't place are reported as "elsewhere on your Mac" rather than guessed.
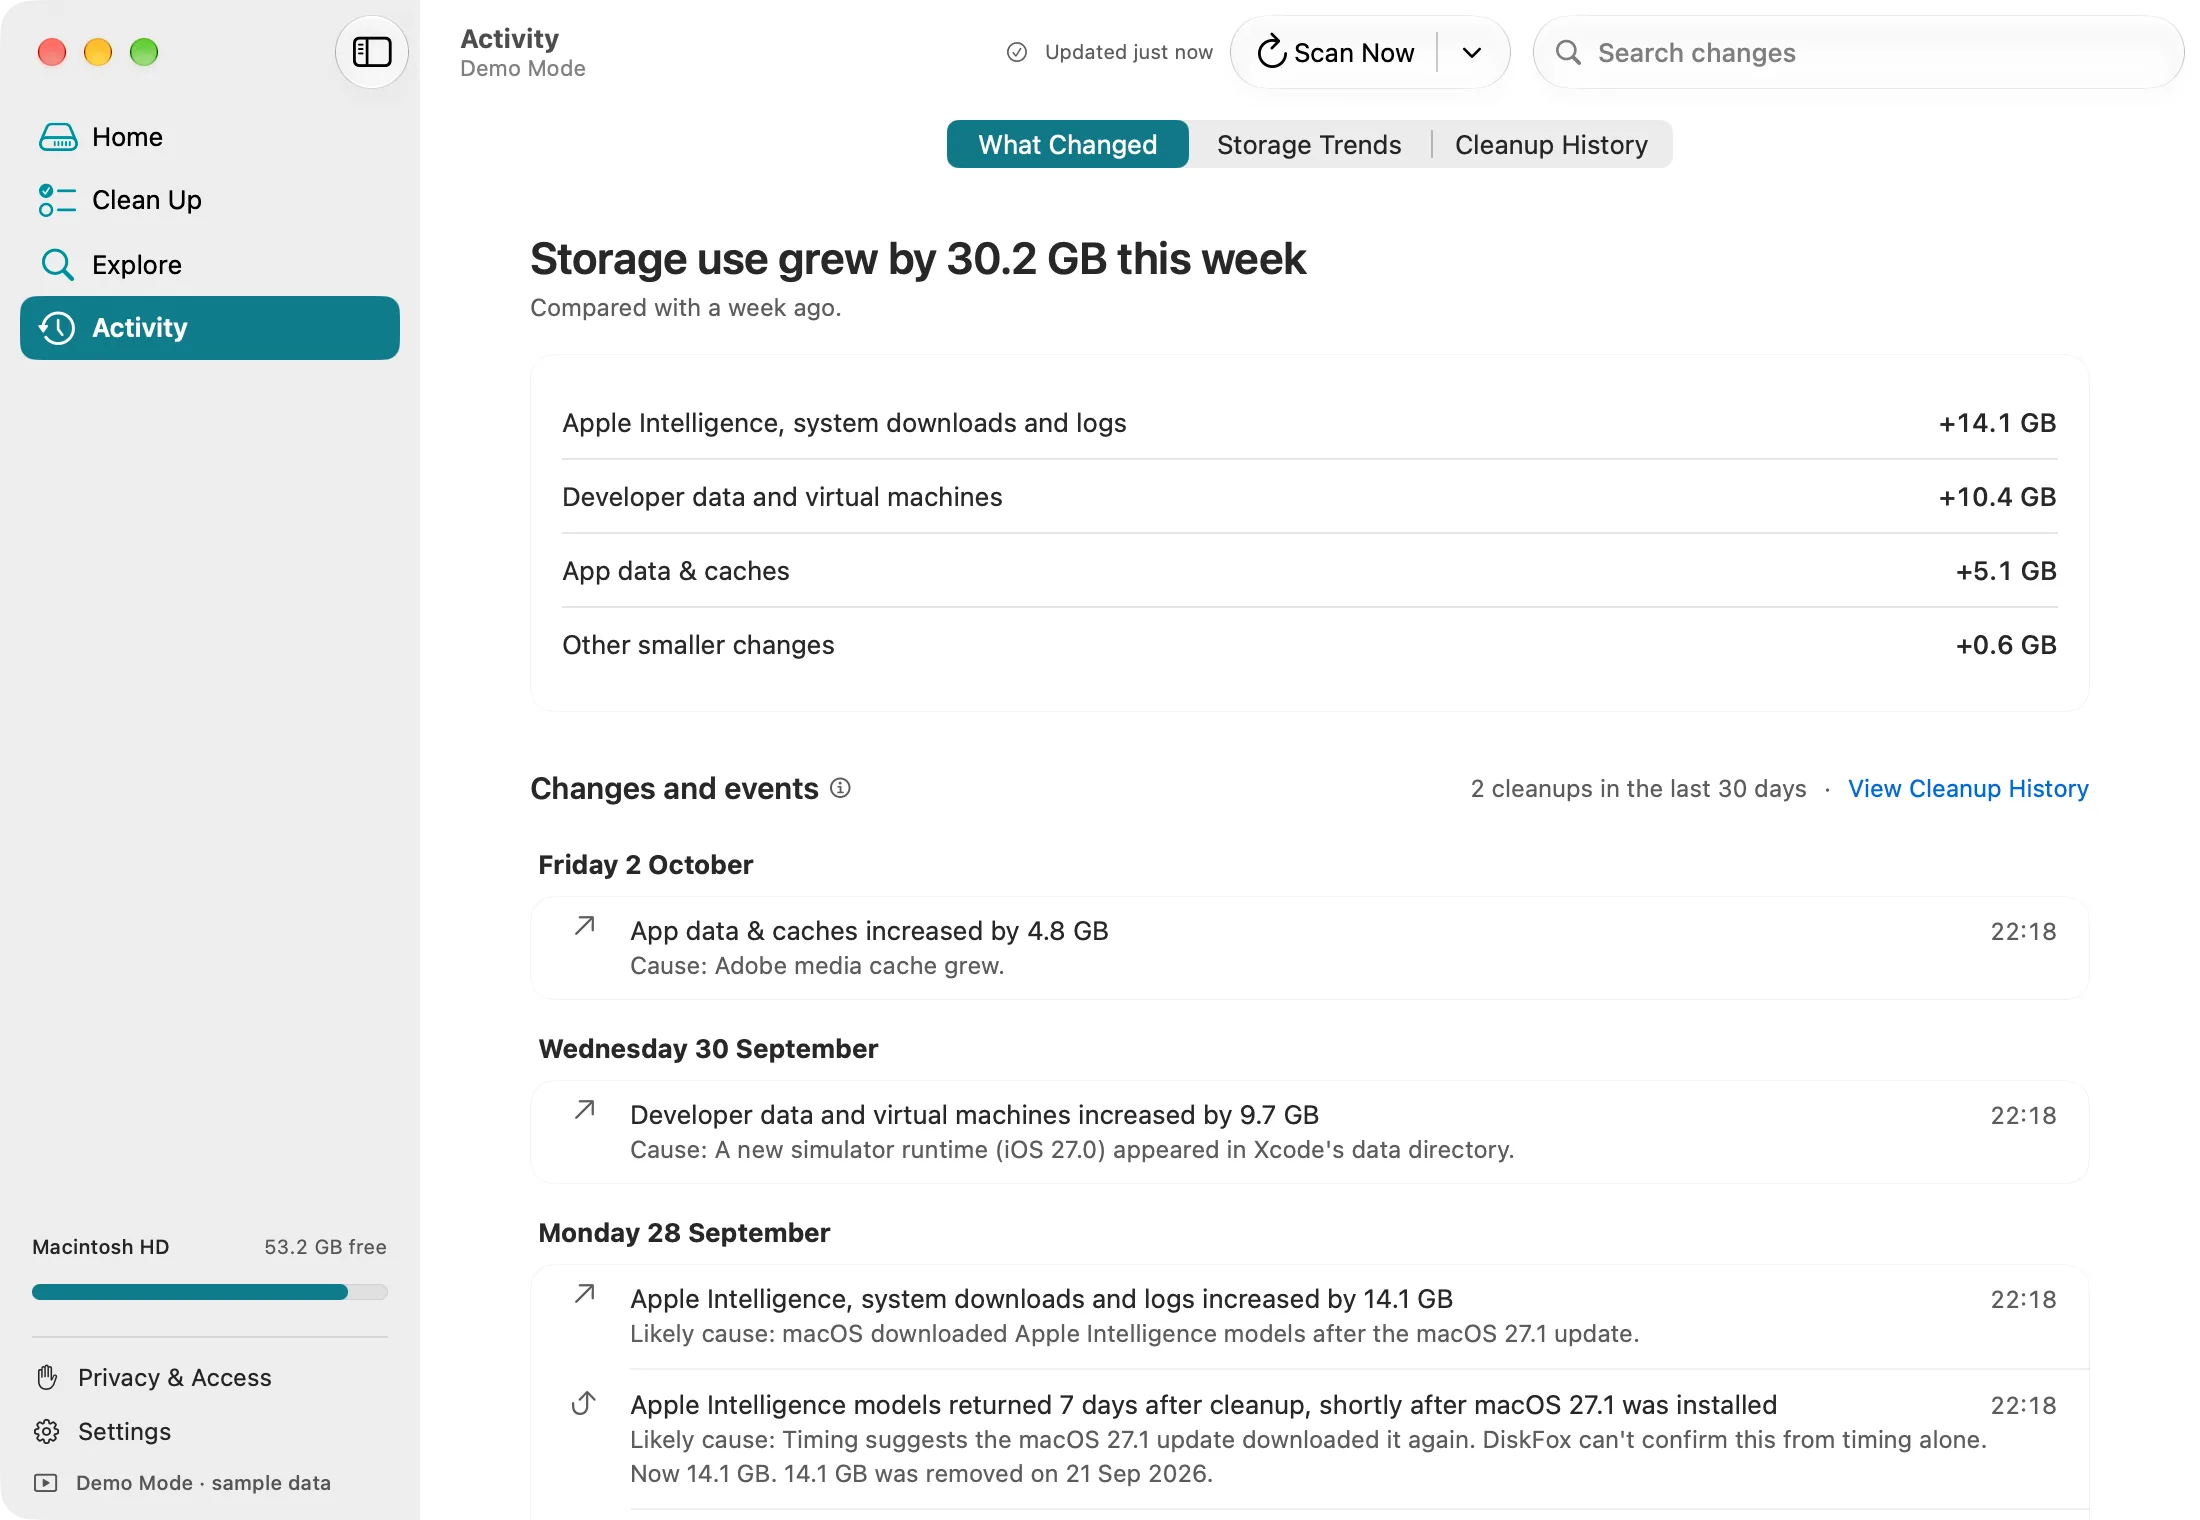
DiskFox's What Changed view, shown in Demo Mode with sample data.
- Storage Trends charts used storage, a group or a pinned folder over 7, 30 or 90 days or all time. Each point is a measurement from a scan, not a prediction, so you need at least two scans.
- History keeps every scan for 30 days, then one a day for up to a year, then one a week. It stays on your Mac, and you can export it as JSON or erase it.
- Automatic checks run every 3, 6 or 12 hours, or once a day, plus a quick check when DiskFox opens.
- Keep an Eye on a Folder pins a folder in your home folder. It gets its own line in What Changed when it changes by 100 MB or more. DiskFox only measures it and never removes anything from it.
- Storage Alerts can notify you when something passes a size limit, when files sit untouched, or when space returns after a cleanup. They only notify you. DiskFox never removes anything automatically.
It has limits. DiskFox measures your startup disk only, not external drives. It only checks while it's open, though you can set it to open at login. A "Likely cause" is a well-informed guess, not proof. To include Desktop and Documents it needs Full Disk Access, and Downloads needs its own permission. The DiskFox storage tracker page has more detail.
What to do next
- Take your first snapshot today, with the script or by noting Storage settings. Every comparison needs a starting point.
- Set a weekly reminder and take the next one.
- When a folder jumps, look inside it. How to find large files on your Mac shows how.
- If the growth is outside your home folder, check what counts as System Data before deleting anything.